Adventures in Brewing

Friday, March 7, 2014

System Update

Well our system collaboration has now turned into a business venture. Andy and I are going to try and open a commercial nanobrewery with no debt and no investors. A feat that is difficult but will hopefully become profitable.

We've brewed on the new system once so far. Basically we just took the last ingredients we had on hand and made a hodgepodge beer that we affectionately named StupidBrew. We'll be ordering a bunch of ingredients soon to start some test batches of our flagship ales. Only problem we are currently encountering is our ability to screen out hops. I am almost done constructing a new hop screen that should work better. I'll take some photos soon and post them.

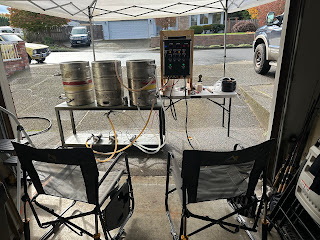
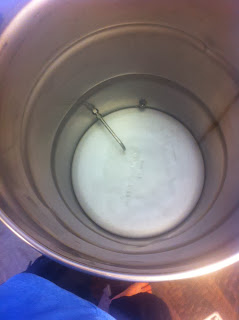
Below are some pictures of how things have progressed. Unfortunately I didn't take many pictures of the process. These pictures and more updates can be seen at our facebook page.

The overall system. One day we'll build nicer stands

Me in a kettle

Mounting the Counter Flow Chiller mid-brew

Our first conical. 110 Gallon capacity
 

Friday, January 3, 2014

False Bottom

As stated in a previous post, we decided to fabricate our own false bottom. Basically I just ordered a 24" x 24" stainless perforated sheet with 0.09375" holes with a 0.15625" stagger. After I climbed inside the kettle my wife placed the perforated sheet on top and I used a sharpie to trace the shape of the kettle. Then I cut out the circle with my angle grinder.

The handle and the leg supports will be made out of  0.125" x 0.75" stainless flat bar and bent into shape. I cut each support/handle at 10" and make marks where I want the bend. Placing the flat bar in my vice at the appropriate mark I hit it with a hammer until it has a 90 degree bend.

As of now I have the sheet cut into a circle, the handle shaped, and the handle attached. Hopefully this weekend I can clean up the cut a little bit, fabricate the supports, and then install the supports.

The false bottom so far. Still need the edge cleaned up and
supports installed.
 

Thursday, January 2, 2014

System Progress

Andy went and dropped off our HLT and Boil Kettle for welding. We are having three 2-inch tri-clamp ferrules welded into each. These are where the heating elements will be attached. Going this route versus a weldless set up allows us to easily remove the elements for cleaning. Hopefully the welding will be finished by the beginning of next week.

We are constructing our own false bottom. The lowest price we could find for a custom built one was upwards of $250. We are building our own for less than half that price. The materials arrived at our house today and will hopefully be fabricated this weekend.

As of now the only items we need to be able to test our first batch on the new system are:
4-heating elements
4-element adapters

We will need more than these items to brew the way we want to. But these are the last items we need for this system to be able to run.


Thursday, December 26, 2013

Collaboration System Progress

Our system is progressing. We were able to order our larger kettles, read: 55 gallon stainless steel barrels. All three of them have arrived and we have begun converting them. We are going to have tri-clover ferrules welded in for the element attachments. The boil kettle and hot liquor tank are off having that done right now.

I only currently have a picture of the mash tun in progress but all three kettles look the same. Eventually I will polish them all to a mirror finish, but for now they will be used as is.

Mash tun with outlet and sight glass. Sight glass
still needs to be trimmed for height. Hole in the top
right is for the inlet, I was short a washer so I was not
able to install that fitting.

Inside view of the mashtun, fairly simple.
Now I just need to order the parts to build a custom
false bottom.

Sunday, October 13, 2013

Yet another new system... (progress)

My kettles and cheapo stand have been moved into the basement. This is what we will use until we have the money to build a new stand and order the large 55 gallon kettles.

Almost everything is in place, just a couple modifications need to be made still. We switched the flow from starting on the left side and moving toward the right. It now flows from the right toward the left. This necessitates moving pumps and couple other small changes.

The vent hood has been fabricated and ducting purchased. It will be installed today or tomorrow and first full wet test, mock brew, and calibration will happen tomorrow.


Hoses in this pic are stretched weird. Once the pumps are moved
over it will look and operate better. 


A better view of the Control Panel. 

Friday, October 4, 2013

Panel is complete! (well, almost...)  All wiring is finished and has been tested. The only thing now is to add a little bit of silicone to some of the joints to keep it waterproof.

The picture looks the same as the previous post but the amp meter is now reading the amperage going through. I only had one element hooked up so its showing 22.1 amps. If I run both it will show the total 44 amps.
Another note, only the boil PID is showing temp.
I didn't bother to bring out all the temp probes while
testing. I just moved from one to another to make sure
each one works correctly.

Monday, September 30, 2013

An update on "Yet another system"

Panel tags have arrive and been installed. Wiring is going well. At this point the only things we have yet to finish are the following:

1. Install top plate with heatsink
2. Run 6 Gauge power wiring to the heating element contactors (this includes the SSR connections)
3. Run wire from the temperature probe receptacles to the PID's
4. Run wire from the AC Shunt to the ammeter
5. Run 2 hots to the voltmeter
6. Final testing

Pics:


A look at some of the wiring inside. Not everything is
finished. Once the wiring is complete everything will
be attached well with no loose wires hanging around.


The bottom with all receptacles installed and tags installed as well
Everything lit up. Volt/Amp meters have power
but are not reading anything yet, same with PID's